Homemade Pretzels Anyone?
So I've been thinking about making pretzels for quite some time. They are sooo good and I honestly do crave them quite a bit. However, I've never taken the time to try to make them on my own.
Since spring has not truly started yet and we just got covered with more snow...

I had some time on my hands. Because quite frankly - when the roads are covered... it's just no fun to be out in that stuff. Since I'd be staying indoors, I decided to stop and finally take the time to make pretzels. Now that I have - my next pretzel test may be to figure out if I can freeze them and then just make a few at a time instead of a whole batch... but it'll be awhile before I try that... after two cookie sheets of pretzel bites in just over 24 hours, I'm honestly pretzeled out. But they were SUPER GOOD!

Anyways, they weren't exactly a ton of work, but then again, I did use the bread machine to make the dough :) But they still took a bit of time. Simply because of the steps that it takes to make a pretzel... I have seen recipes that look very simple - they're pretty much like making bread. Make the dough and bake... but I've also read that really makes them taste like pretzels is the water bath they take before they bake. I will admit, I thought of making half with the water bath and half without. However, I did not do that - I tossed them all in water because I wanted that true pretzel taste. And may I just say - there is something about a fresh pretzel that comes straight out of the oven that is just totally amazing! The pretzels you get at the mall or sporting events or wherever - have absolutely nothing on one fresh out of the oven! I think I'm officially hooked... all other pretzels will just never be the same.
So if you're up for the process - I think you'll find it worth it. And once they come out of the oven, melt some cheese and make a cheese sauce and you will be in second heaven :)
Pretzel Bites:

1 1/3 Cups Warm Water
2 Tbl Milk (I used Almond Milk as it was all I had - still tasted like a pretzel :) )
2 Tbl Butter
4 Cups Flour
1/3 Cup Packed Light Brown Sugar
1 Pinch Sea Salt
2 1/2 tsp Active Dry Yeast
Put warm water, milk and butter in the bottom of your bread machine pan. Then top with your flour, brown sugar, and salt. Make a small well in the flour for your yeast - being sure the yeast does not touch the water. Turn the machine onto pasta/dough, close the lid and walk away until it's done.

Once it's done, take the dough out and knead it with some flour for a few minutes.

Then take it and roll the dough into 1 inch balls. I covered them lightly with plastic and a warm damp towel and let them rest for 10 minutes.

Then I removed the towels as they were cold and just left the plastic on for 20 more minutes.

Preheat oven to 425 degrees F.
In a large stock pot, bring 2 quarts of water to a boil. Then mix in 1/2 a cup of baking soda -- it will bubble and fizz quite a bit so you want a fairly big pot.

Drop one dough ball in, pick up another, flip the one over and drop the new one in. Grab the next, take out the first, flip the second, and drop the third -- repeat until all dough balls have been in the water bath for at least 30 seconds, but not more than a minute. I tried to stay as close to 30 seconds as possible.
When you remove them from the water, use a slotted spoon so that you can drain out the water and put it on a lightly greased baking mat in a cookie sheet (or a slightly more greased cookie sheet).
If desired, lightly cut the tops to get that color change and sprinkle with coarse sea salt.

Bake for 10 - 13 minutes, or until golden brown.

Let them cool for a few minutes and then enjoy warm or at room temperature.
I left the ones uneaten on a cookie sheet over night - I heard they get soggy if you put them in a bag or plastic, so I left them in the open air... and day two - still just as good :) That's why they didn't last more than 24 hours :)
Since spring has not truly started yet and we just got covered with more snow...

I had some time on my hands. Because quite frankly - when the roads are covered... it's just no fun to be out in that stuff. Since I'd be staying indoors, I decided to stop and finally take the time to make pretzels. Now that I have - my next pretzel test may be to figure out if I can freeze them and then just make a few at a time instead of a whole batch... but it'll be awhile before I try that... after two cookie sheets of pretzel bites in just over 24 hours, I'm honestly pretzeled out. But they were SUPER GOOD!

Can you smell the yummy pretzels? MMMM!
Anyways, they weren't exactly a ton of work, but then again, I did use the bread machine to make the dough :) But they still took a bit of time. Simply because of the steps that it takes to make a pretzel... I have seen recipes that look very simple - they're pretty much like making bread. Make the dough and bake... but I've also read that really makes them taste like pretzels is the water bath they take before they bake. I will admit, I thought of making half with the water bath and half without. However, I did not do that - I tossed them all in water because I wanted that true pretzel taste. And may I just say - there is something about a fresh pretzel that comes straight out of the oven that is just totally amazing! The pretzels you get at the mall or sporting events or wherever - have absolutely nothing on one fresh out of the oven! I think I'm officially hooked... all other pretzels will just never be the same.
So if you're up for the process - I think you'll find it worth it. And once they come out of the oven, melt some cheese and make a cheese sauce and you will be in second heaven :)
Pretzel Bites:

1 1/3 Cups Warm Water
2 Tbl Milk (I used Almond Milk as it was all I had - still tasted like a pretzel :) )
2 Tbl Butter
4 Cups Flour
1/3 Cup Packed Light Brown Sugar
1 Pinch Sea Salt
2 1/2 tsp Active Dry Yeast
Put warm water, milk and butter in the bottom of your bread machine pan. Then top with your flour, brown sugar, and salt. Make a small well in the flour for your yeast - being sure the yeast does not touch the water. Turn the machine onto pasta/dough, close the lid and walk away until it's done.

Once it's done, take the dough out and knead it with some flour for a few minutes.

Then take it and roll the dough into 1 inch balls. I covered them lightly with plastic and a warm damp towel and let them rest for 10 minutes.

Then I removed the towels as they were cold and just left the plastic on for 20 more minutes.

Preheat oven to 425 degrees F.
In a large stock pot, bring 2 quarts of water to a boil. Then mix in 1/2 a cup of baking soda -- it will bubble and fizz quite a bit so you want a fairly big pot.

Drop one dough ball in, pick up another, flip the one over and drop the new one in. Grab the next, take out the first, flip the second, and drop the third -- repeat until all dough balls have been in the water bath for at least 30 seconds, but not more than a minute. I tried to stay as close to 30 seconds as possible.
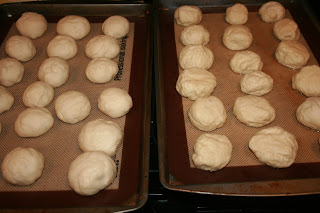
When you remove them from the water, use a slotted spoon so that you can drain out the water and put it on a lightly greased baking mat in a cookie sheet (or a slightly more greased cookie sheet).

(the ones on the left haven't been dunked yet - you can see their texture changes just a little)
If desired, lightly cut the tops to get that color change and sprinkle with coarse sea salt.

Bake for 10 - 13 minutes, or until golden brown.

Let them cool for a few minutes and then enjoy warm or at room temperature.
I left the ones uneaten on a cookie sheet over night - I heard they get soggy if you put them in a bag or plastic, so I left them in the open air... and day two - still just as good :) That's why they didn't last more than 24 hours :)


Comments
Post a Comment